Canon 24mm 2.8 Lens Hack for Sigma MC-11 Adapter
On an APS-C camera like the 24mm is around a 38mm on a full-frame. 35mm is the closest to the focal composition of the human eye and the 24mm ended up being my favorite lens.
I used to be a Canon dude. Way back when DSLR cameras started being used for shooting video, I jumped in with a Canon 7D. I still have that camera. It was/is a robust camera for wildlife and sports photography, but is was an indispensable tool for filmmaking. I really liked the fact that it was virtually indestructible and was weather-sealed. With that investment, I started to get into lenses, Prime lenses specifically. My initial arsenal consisted of the Canon 10-18, the ”Nifty” 50mm 1.8, and later I would purchase two pancake lenses, the 24mm and the 40mm. I loved the pancake lenses, because they allowed me to make the profile of my 7D smaller. They helped m carry around my camera more. On an APS-C camera like the 7D, a 24mm is around a 38mm on a full-frame and the 40mm is roughly a 64mm. 35mm is the closest to the focal composition of the human eye and the 24mm ended up being my favorite lens. When I switched to my Sony Mirrorless, I looked into adapters and found the MC-11 by Sigma. It would allow me to utilize my Sigma glass along with most of my Canon lenses.

The Sony A6500 with MC-11 Adapter & Canon 24mm 2.8 Pancake Lens
There was a problem. Canon makes two types of EF mounts, the regular EF and then the EF-S mounts. The EF-S mounts have a flange that extends out a bit further, thus preventing them to mount onto the MC-11. I was severely disheartened and had to shelve my EF-S 10-18 and the 24mm lenses, until I found out about the Fotodiox adapters. It had some extra space that allowed for the extra flange, but was expensive and it wouldn’t work all the time. You had to use the lenses in manual mode and it would cause the camera to freeze up from time to time. I don’t mind manual lenses and actually prefer them, as I like to “rack focus” and have a follow focus for my rig. I ended up sending the damn thing back,.the freezing was too much. I shelved the two lenses again.

The Canon 24mm 2.8 Pancake Lens post flange removal
As I got more familiar with my Sony Mirrorless, the A6500, I purchased the Sony 10-18mm 2.8, the Sony 35mm 1.8, the Sigma 30mm and the Sigma 18-35mm 1.8. These lenses cover most of my needs for filmmaking and in a pinch, I mount the Canon 50mm 1.4 and the 85mm 1.4’s with the MC-11 adapter. Even with all of those focal options and low-light capabilities, I was missing the 24mm. There are other adapters, but that would take me into another space of lenses, outside of Sony, Sigma, or Canon. I was weary of adding another equipment set to the mix. Something told me to just hang onto the lens. Then I saw a YouTube video about adapting the Canon 10-18 by Technology Mafia. This guy just cut the back off with a hacksaw and mounted to the MC-11. I’m all for DIY hacks, but chopping lenses freaked me out. SO the 24mm sat for another 6 months. In that time I almost sold the Canon 7D and all of the associated gear, including the 24mm pancake.

The Canon 24mm 2.8 Lens mounted on the Sigma MC-11 Adapter
Earlier this week, during the Thanksgiving Holiday, I stumbled upon a YouTuber, Max Lee. Max Lee is one of these guys who sincerely utilizes cheaper gear to his benefit. On one of his videos I saw him bring out the Canon 24mm and he said you could just pull the flange off. It was 2:30am on Sunday the 25th of November when I saw the video, a good year and a half after having shelved the 24mm (for the 2nd time). To my amazement, the flange just pulled right off! While the back of the lens is kind of ugly, when its mounted to the MC-11, it looks about the same size as any of my primes. I can’t even tell you how happy I was to get this lens working with my set up again. It’s only a 2.8 and suffers in low-light, but it takes a nice picture. If you need a 24mm in your quiver of lenses, get the pancake lens from Canon and adapt it. It only costs $130 new, but you could probably find it for like $70 or less. It pairs with the Sigma MC-11 great. Auto-focus is pretty snappy and you can use Continuous Focus too. This lens is on my camera right now and in my bag again. If you see me, ask me to take your picture, or maybe I’l beat you to the punch and ask you.
- Digital Ninja®

*Here are some pics I took immdiately following the hack!


Self-Portrait
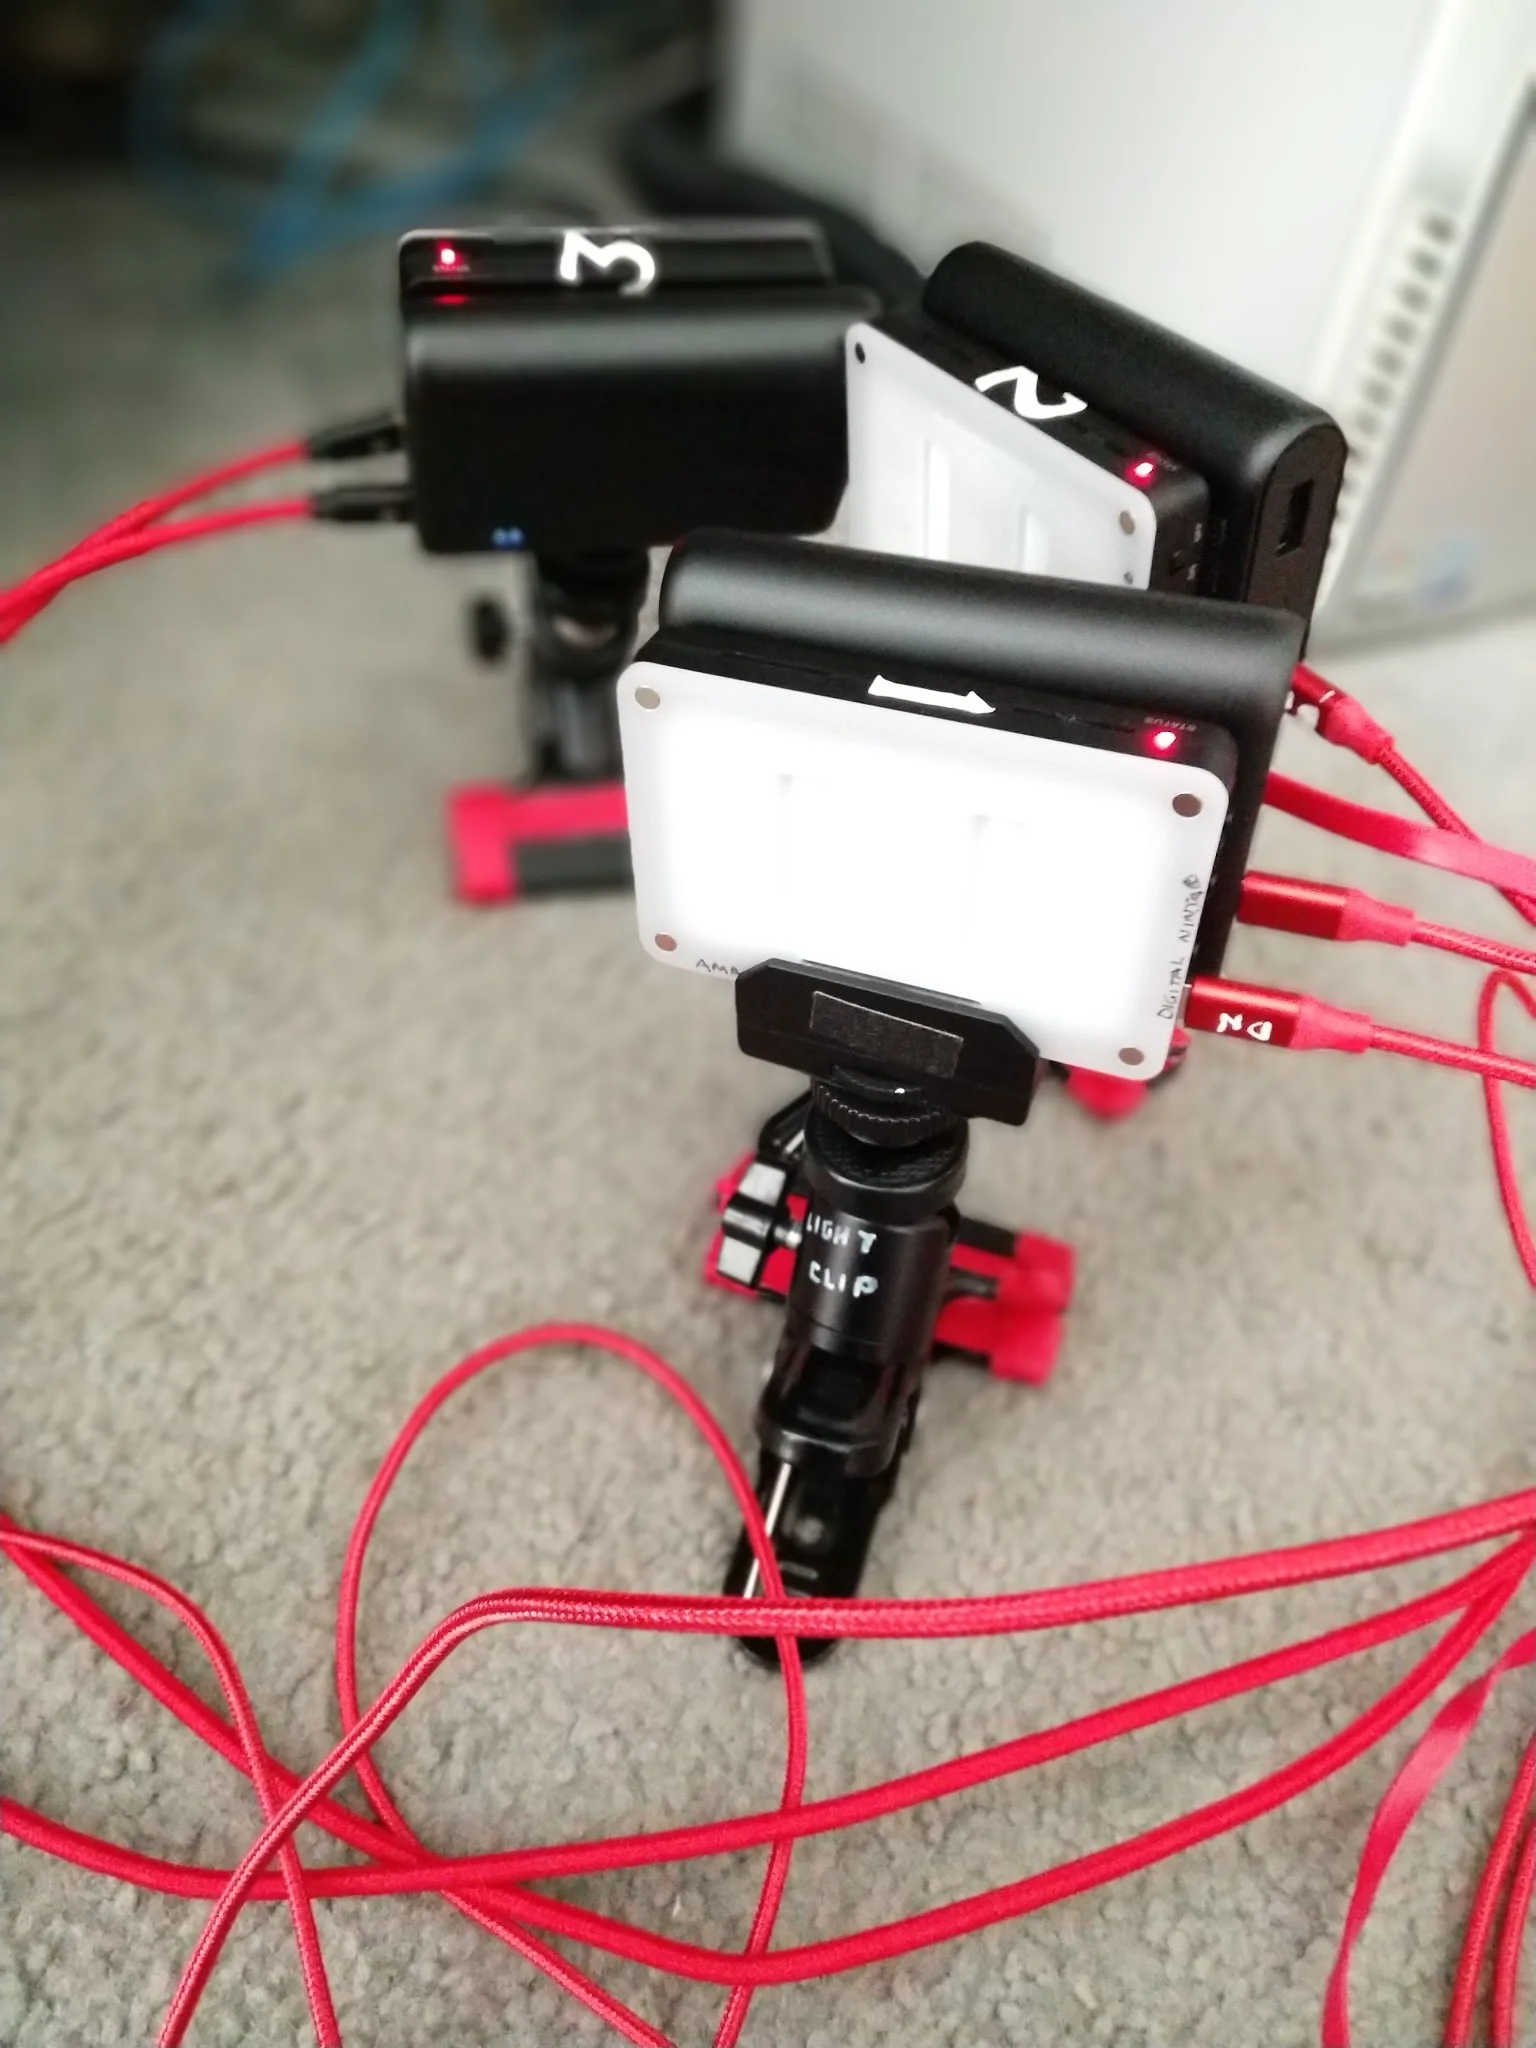
The Digital Ninja® 3 Point Quick-Clip, Mini-Light Kit
The Aputure AL-M9 LED Light is an older model, rechargeable, lightweight, and pocketable light source. It is extremely bright, considering it's size. With some key accessories, you can build an exceptionally powerful little kit, enabling you to move faster & lighter.
The Aputure AL-M9 LED Light is an older model, rechargeable, lightweight, and pocketable light source. It is extremely bright, considering it's size. With some key accessories, you can build an exceptionally powerful little kit, enabling you to move faster & lighter.

Aputure AL-M9
The M9 debuted 2 years ago and was an extremely sought after light because of it's versatility, features, and price point. These days you can pick up a brand new one for around $45. Aputure's latest model the MX, is priced at $145. For the price of the MX, you could get (3) M9's. There are other mini LED models similar to the M9, but the copycats don't measure up in build quality. If you are looking for a solid mini-kit, pay the extra money for the Aputure brand. They are worth it.

M9 LED Light mounted on Ball-Head Clip
The M9's are definitely my favorite lights (that I own) because of their size and amount of light they output. They also come in handy for special lighting scenarios where a mini light source is necessary. One of my favorite things about them too, is the package they come in. A case is included and there is room for some extras. I had some left over gels and made a series of gel kits for them. The magnetic face plate makes it easy to switch to any color I want.

M9 mounted on Ball-Head Clip (with Anker PowerCore & Powerline Cable)
The lights, by themselves, last about 1hr 30min on high. Initially I went and bought 6 ft. cables and power adapters to keep them plugged in and charging if I was ever near outlets. Later, I found the Anker PowerCore 10000 battery packs which were roughly the same size as the LED's. I got some Velcro and married the battery packs to the lights. I then purchased some 1ft. cables to make the kit look really clean and professional. With the battery packs and lights connected, I can run these lights all day. I make sure to turn them off when not in use and have them charging during meal breaks.

The Digital Ninja® 3 Point Quick-Clip, Mini-Light Kit
I enjoy keeping my gear nimble and the cases that come with the lights- they help keep everything organized. I'm able to stash the 1 ft. cables and gel kits in the cases, then I attach the longer cables to the included carabiners. The batteries pack easily. The clips are the only unruly pieces, but will still fit in a regular sized bag or backpack. Sometimes I just attach the clips to a strap on the outside. This mini-kit allows me to get into almost any room quickly and utilize a 3pt light set-up. The clips also make pretty good stands if I am able to place them on a flat surface.

Versatile. Fast. Bright.
Be warned: These won't illuminate an entire room, but they will definitely help you in low light situations. The M9's really shine as fill lights, catch lights, and hair lights, and also for interviews, headshots, 2 shots, and talking head scenarios. This light has been aptly named the "Swiss Army Light". This is the kit I leave the house with when I think I might need a bit of light help.
- Aputure AL-M9 LED Light $45
- Anker PowerCore 10000 $26
- Anker 1ft. PowerLine Cable $6
- 1/4" Ball-head Clip $9
*I wouldn't skimp on the cables. Anker makes solid cables & you don't want cheap cables in-between your batteries and lights!
I hope you enjoyed this glimpse into my Digital Ninja® 3 Point Quick-Clip, Mini-Light Kit. Follow me on Instagram @d1g1tal_n1nja, YouTube: https://www.youtube.com/user/DigitalNinja3 or bookmark my website: www.digitalninja.us .
- Digital Ninja®

Digital Ninja ® : RECON
WE FIND WHAT'S COOL, SO YOU DON'T HAVE TO. ™
THE LATEST


All photographs, videos, animations, designs, and other images contained in this blog are property of their respective owners. Digital Ninja® makes no claims to rights or the appearance of any claims to rights regarding the property referenced here, on the owner's websites, advertising, literature, or elsewhere (unless otherwise specifically noted). All efforts are made to credit and recognize the original content creator and/or property owners. Additionally, in the post comments portions of the site: the views and opinions expressed are those of the authors and do not reflect any official policy or position of Digital Ninja® or its affiliates.
FAIR USE
PARODY